Tuesday, November 20, 2012

Thanksgiving Treats


When it comes to holidays and fun days like Valentines, etc I always make something for Daegens teacher, aides and classmates. He's in an Autism classroom with only 8 students so it makes it pretty easy. 

I made these cute Hershey nugget holders for the classroom staff and they really liked enjoyed them.
The tags and candy wrappers are a free printable file from FleeceFun.com. Just print and cut! I cut the wrappers out using my paper trimmer and I used a Spellbinder scallop square die to make the tags a bit cuter. Incase you're wondering I used Wilton pretzel bags from JoAnns and square Wilton sucker bags for the cookies below.

You can find them here:


I wanted to avoid giving his classmates candy, so I baked some Chocolate Chip Pumpkin Cookies. They were just a box mix from the store that I added the chips to. The cute Turkey tag on the front of the package was a free cupcake topper printable from www.Kate.net. I used it as a package embellishment instead.  Again I used a Spellbinder die, the scallop circle.


You can find the file here:


Happy Thanksgiving, I hope I've inspired you today!



Wednesday, October 31, 2012

Happy Halloween!


I love Halloween and ANYTHING skulls. October is my time of year, tho I enjoy skulls  year round. They are one of my guilty pleasures. So in this post I'm just going to share some Halloween crafts I made this month. If you have any questions about any of them, feel free to post and I'll get back to you. =)

I hosted a Halloween themed ATC swap in a swapping  group I own on Facebook. I used the Tim Holtz Bell Jar die, his Halloween stamps and embossing folder, acrylic (Cricut cartridge clamshell package) and heat embossing powder. I love how it turned out.


This was a design team project. I used the supplied paper from Teresa Collins "Haunted Hallows" collection.
I got the acrylic pendant setting from a craft sale and it just happened that oval Epiphany Crafts punch fit the opening. Added a few rhinestones and a bow, put it on a black chain and called it down. I get compliments on it every time I wear it.


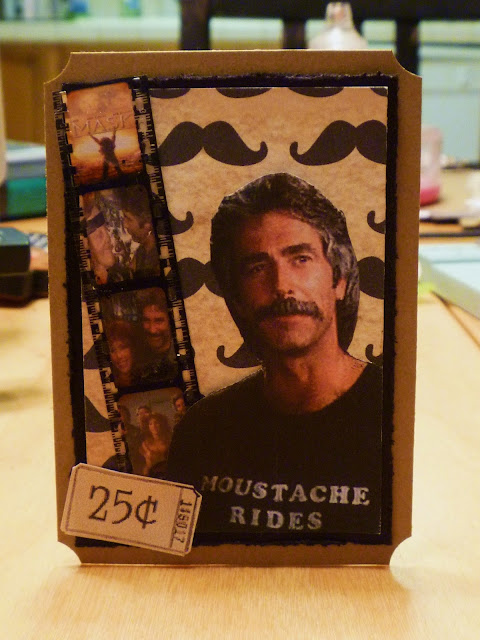
This month I hosted another ATC swap, this time it was your favorite movie or tv show. We had a good turn out of some really cute cards and nobody flaked this time! lol 

One of my fave movies ever is MASK starring Cher. It's the story of a  teenager with a massive facial skull deformity and his biker gang mother who attempts to help him live as normal a life as possible under the circumstances. It makes me laugh and cry every time I see it. If you haven't seen it, check it out. You won't be disappointed.


Happy Halloween, I hope I've inspired you today!

Tuesday, October 23, 2012

Downtown Tape


Happy October Krafty friends!! 

Halloween  happens to be one of my favorite holidays. So when I was asked to design something Halloween themed for A Homespun Affair October sponsor Downtown Tape, I jumped at the chance. I'd never used washi tape before so I did a little research and WOW there are soooo many things you can do with the stuff! I'm not gonna lie, it wasn't easy at first trying to figure out what to create for Halloween using dot and flower patterned tape. After hours of Googling, Pinteresting & smoke coming out of my ears, I came up with this altered frame using the popular and trendy 'washi tape' & I love the end result! 


 This frame happens to be a $1 unfinished frame from Michaels, but you can use any frame you like. You could also put a photo in the middle instead of embelleshing the center.

Supplies & tools used:
Downtown Tape -
(O What a Beautiful Morning in OK City & Going Green in Portland)
Create A Critter 2 Cricut Cartridge
Michaels $1 unfinished 5"x5" frame
White Arcylic Paint
Recollections Cardstock
Swiss Dots Cuttlebug Embossing Folder
Queen & Co. Pearls - Lavender
Stickles-Orange Peel
Pop Dots
Googly Eyes

How I did it:
I started by painting the frame white. When dry I adhered the washi tape diagonally with spaces between each strip, overlapping the tape to the back of the frame for a more finished look. Next I cut the owl at 3", the bat at 2" and "BOO" at 1.5". I embossed a 3"x3" piece of cardstock using the Cuttlebug Swiss Dots folder and adhered it to the backing that goes in the center of the frame. For the owls body I put a couple strips of washi tape on the cardstock before cutting it on the Cricut then assembled the cuts, adding googly eyes for a fun effect. For dimension I adhered all three cuts using pop dots. I placed the pearls on two sides of the frame opening and called it done.

  Thank you, Downtown Tape for the chance to work with your wonderful product. It was my first time working with washi tape. I found it fun, versatile and easy to work with. Definitely something I'll be adding to my ever growing collection of supplies.

Be sure to check out Downtown Tape, they have low prices as well as a great selection of  Washi tape.


Thanks for stopping by. I hope I've inspired you today!


Monday, September 3, 2012

Swap ATCs

I recently joined a new group on Facebook that does some different swaps. One of the ladies Linda is hosting her first swap. It's an ATC swap. I've made 2 ATCs in the past so I thought this would be a good way to jump into the group. I'm just sharing what I created.


I had fun making these and I just love that bugs head cut.

Thanks for stopping by. Leave a comment if you like. 

I hope I've inspired you today!

Saturday, September 1, 2012


Today is the release of
A HOMESPUN AFFAIR
September Edition


This month in Kidz Korner I share with you a fun and easy way to upcycle baskets from my favorite summer treat. Strawberries!


If you haven't already, visit A  HOMESPUN  AFFAIR and check out everything we have in store for you. Fun projects, tutorials, loads of inspiration, challenges, giveaways and more.


Friday, August 24, 2012

Designs on Cloud 9


Happy Friday Krafty Friends!

Today I'm sharing with you a home decor project I made for one of A Homespun Affairs Augusts sponsors,  Design on Cloud 9. They have adorable cutting files in several formats and there is a weekly freebie you'll want to try too.


Here's a sneak peek, but I'd love it if you checked out the full project at  A Homespun Affair and let me know what you think. 


Supplies used:
Design on Cloud 9 Cutting File ~ "Just Add Water"
Recollections Cardstock
Muddpuddles Sand ~ Malibu Beach
Prima Flowers
Queen and Co. Pearls
Tattered Angels Glimmer Mist ~ Pearl
VersaColor Ink Pads
Seashell

Thanks to our sponsor Design on Cloud 9 for the cutting file. I enjoyed creating with it!

Thanks for stopping by and I hope I've inspired you today!

Wednesday, August 1, 2012

Teachers Gift - Post-It Note Holder Tutorial


Today is the release of
A HOMESPUN AFFAIR
August Edition


This month on Kidz Korner I bring to you a quick and easy Post-it Note holder
 "Back 2 School" gift. I know our teachers are overworked and underpaid so why not
show that we appreciate them? What better way than a handmade gift from your little student?


For this project you will need:
An acrylic 4x6 frame
3"x3" Post It Notes
Patterned paper
Coordinating embellishments
A paper trimmer or safety scissors
Double stick tape
Adhesive (the type will depend on the embellishments)


Using a paper trimmer cut the patterned paper at 4"x6". 
Slide it into the frame. 
Using double stick tape, adhere the Post It Notes to the frame. 
Now comes the fun part! Embellish the the frame using stickers, ribbon, etc. Let your childs imagination run wild. 
Give to the teacher to enjoy!

Helpful hints:
If you don't have a paper trimmer you can use the frame paper insert as a template to cut your patterned paper using safety scissors. 
You can find the acrylic frames at a dollar store or WalMart for $1.
Dollar stores carry multi-packs of Post It Notes.
The Post It Note holders can be made in any theme for a quick and useful gift.


 So stop by  A HOMESPUN AFFAIR and check out everything we have in store for you. 
                            Tutorials, loads of inspiration, challenges, giveaways and more.


I linked up to Craft Lightning Week


Monday, July 9, 2012

End of the school year thank you gifts

I know it's a little late but these were meant to be for a blog hop that I didn't end up participating in, so now I can show them off.

My youngest son is Autistic and he is in a classroom with 9 other Autistic students. The teacher and aides are  awesome and work wonders with these kids. They put up with a lot too. I could never do it, one is plenty for me. lol I like to show our appreciation at the holidays and the end of the school year with a little something for each of them. This year I made these cards and put a Starbucks gift card in each one. They were really fun to make and pretty easy too. I cut the coffee cup from Cricuts "Love You Latte" cartridge. 

The inspiration for the card as well as the background came from  eighteen 25. You can find it here if you're interested in making your own. It's a free download. =)


I wasn't sure my sons bus driver was a Starbucks lover so I made him this School Bus card with a gift card to 7-11 tucked inside. He is so awesome and takes great care of my son, we had to show him some love as well. The cutting file is from Creative Kuts. It was a freebie that was actually a mini album cover that I turned into a card. If you love cute cutting files, check them out!


 Thanks for stopping by and checking out my thank you gifts. I hope I inspired you today!


Monday, July 2, 2012

JULY EDITION OF A HOMESPUN AFFAIR


Today is July 1st and you know what that means!
It's the release of 
A HOMESPUN AFFAIR
July Edition


I'm excited to share with you my part of this fabulous e-mag, Kidz Korner. 
This month I show you how to make fun and easy pinwheels for your 
4th of July bbq or parade. 


       So stop by  A HOMESPUN AFFAIR and check out everything we have in store for you. 
                            Tutorials, loads of inspiration, challenges, giveaways and more.


Sunday, June 3, 2012

June 100 Cricut Cartridge Blog Hop - Day 2

Welcome to the June My Cricut Craft Room 100 Cart Blog Hop!


The hop starts at  My Cricut Craft Room, but you should have come from
SheilaIf you didn't start there, please go back to the beginning so you don't
miss any of 
todays blog hop projects. 


My son is graduating from high school next week so I made him a ribbon pin to wear the day of the graduation ceremony. Now the question is, will he actually wear it? lol


Want to make one? Here's how.
I used two carts to make this ribbon. County Fair & Varsity Letters.
Find the ribbon on page 29. I cut ribbon layers (<ribbon> & layer one) at 5 inches. Because I wanted more room for the wording, I cut the circle (<ribbon>, layer one, shift) at 5 3/4 inches. I cut the words using the Varsity Letters cartridge. "CLASS"  was cut at 1/2 inch, "OF" at 1/4 inch and "2012" at 3/4 inch. As you can see it is possible to cut tiny letters such as these if you have a good blade and good mat. I glued the letters to the circle then adhered the circle to the top layer of the ribbon. For dimension I  used foam pop dots between the layers. In addition I highlighted the cuts with some black ink rubbed on the edges, drew a few highlights with a white Signo pen, curled the bottom of the ribbon ends, then finished it off by gluing a 1/2 inch pin on the back. You can find them in the jewelry section of your local craft store. This was a quick and easy project, I had it done in about 20-30 minutes.


~

I have been wanting to make something using the Cricut bug head from the Potpourri Basket cart. Originally I was going to make a vinyl bug head for my car window but green doesn't look so good on a red car. So I decided to make a Cricut bug head keychain to show off my love of the bug!


This is how I did it and you can do it too!
 
I cut the bug head 5 times at 2 1/2 inches using the same technique that I used on my Owl Necklace & Earring Set.  After putting the layers together and the Mod Podge was dry I punched a hole in his antennae using the Euro Punch. I then attached a jump ring and a round keychain ring for my keys. Really very easy and fast. The possibilities are endless using this technique to make keychains using your favorite Cricut cart images.


~


This month Erica is doing CUTTLEBUG giveaways!

Everyday this month she will be giving away Cuttlebug folders as well as a Cuttlebug machine so be sure and visit My Cricut Craft Room every day during the month of June and leave a comment.


Erica is also giving away a Cricut cartridge during this blog hop. To be entered into this give away remember to comment on EVERY blog along the way. Winners will be announced on her blog Tuesday.


Next you're heading to Ericas Blog Candy  to finish up the hop. Don't forget to leave a comment there as well so you are entered into the Cricut cartridge give away. 


Here's the full line up in case you got lost along the way.
Raquel- http://kraftykaboose.blogspot.com <---- You are here.
Blog Candy - http://ericasblogcandy.blogspot.com/ <---- Your next stop.

Thanks for stopping by, I hope I inspired you today!


Friday, June 1, 2012


Happy Friday everyone! What an EXCITING day!! 
Today is the release of the premier issue of 
A HOMESPUN AFFAIR E-Magazine! 

It's jam packed with challenges, giveaways, how-to's, inspiration and more. If you haven't already, head over the to AHA blog  HERE and sign up for the monthly newsletter cause you're not gonna wanna miss a thing!

I'm really excited about this because not only is it a great e-mag I was lucky enough to be chosen to be a part of it. My section of is "Kidz Korner" where each month I'll share with you a project that you and your little one can create together.  For June I chose to make a Fathers Day gift. A Ribbon Spool Treat Holder for that special guy in your childs life. Hop on over and check it out for more details on how to make one.


So don't forget, you can view the PREMIER EDITION and subscribe to it HERE.
You can also find the Color Challenge and how to enter it there as well.
Good luck!


Monday, May 21, 2012

Letter Of The Day - U


Welcome to the Letter of the Day at My Cricut Craft Room!

While trying to decide what to make for todays project, I thought of my friend Maria. When I started scrapping four years ago I joined a few scrapbooking groups on MySpace where we met. We became good friends and eventually met in person when she came to visit and go to a Scrapbook Expo with me.

This sweet little girl you see here is Marias daughter, Sophia. The reason I thought of her is because Sophia, who has been through so much for being just 5 years old had open heart surgery last week.  Maria always refers to her as her 'Princess' so I thought to myself, every little Princess needs a Unicorn Magic Wand and if any little girl deserves it, she does. So I made it for her with lots of love. I'll be mailing it to her this week and I hope she enjoys it as much as I enjoyed making it for her.

 Here's Princess Sophia, bravely getting ready to go into surgery. She's such a strong girl, less than a week later she is at home and doing great!


Now that you know what inspired me, here is what came from that inspiration.....
TADA! A Unicorn Magic Wand.


~


Here's how to make one for your little Princess:
The unicorn image is found on page 22 of  the Paper Doll Dress Up cartridge. I cut it at 4 inches (<pixy>, accessories 3). The pictures make it hard to see that I used white flock on the body and pink flock on the tail and mane. Silver Martha Stewart glitter was used on the horn and Glossy Accents on the nose and hooves. A tiny Prima flower with an even tinier Queen & Co. pearl on her mane and a cute pink eyeshadowed googly eye makes her face too cute.  Finished it off by drawing the smile and detail lines onto the flock using a black Signo pen. I used a 3/4" Cosmo Cricket Glüber and attached the pink tulle to it. Then used a Glüber that I cut in half to attach the Unicorn to the tulle. I painted a 12" dowel white, then when it was dry I went over the white with Folk Art Extreme Glitter in hologram color to give it some sparkle. The pics don't show this well, but it looks pretty. I promise! I found some iridescent curling ribbon in my wrapping paper stash that goes well with the pink on the Unicorn so I attached two pieces of it to the top of the dowel as streamers. Next I adhered the tulle with the Unicorn on top of the dowel. Abracadabra, I had a cute magic wand that was quick and easy to make!

If you haven't done so already, please be sure and stop by My Cricut Craft Room to check out all of todays  projects!

Thanks for stopping by, I hope I've inspired you today!


Thursday, May 10, 2012

Theme Day Thursday


My Cricut Craft Room theme for this Thursday was to use a Flower Cartridge. I chose Flower Shoppe. I wanted so badly to go crazy and add lots of flowers to this project but felt it only need a few to look nice. This was my first time using the cartridge. The flowers were easy to put together. I can see myself using this cart a lot in the future. For this project I used the <Scallop1> flower cut at 2" and 3".


I came across a Ribbon Spool Photo Holder project in the current issue of  Northridge Publishings Signature Series magazine. I decided to give it a try. I changed mine up a bit cause well, that's what I do. lol  I don't own a Harley but I got this paper on clearance quite awhile ago and came across it in my car the other day. Yes, it's been living in my car since for months. lol  Now I just need to find some biker chick to give this to!


Wanna make one? Here's how:

Carefully remove the ends of the ribbon spool and cut two circles of paper at any size you like. Adhere a strip of paper around the middle of the spool. Punch a hole in one circle large enough for a dowel. This will be your top. Adhere a paper circle to each end of the spool. Paint a dowel and mini clothespin in a color that coordinates with your paper. Once dry, glue the clothes pin to the dowel. Put glue on the opposite end of the clothespin and insert it thru the hole pushing until it touches the bottom of the spool then embellish it any way you like.  I didn't have a Harley Davidson embellishment to go with the paper so I found the image online, printed it out and hand cut it. I then adhered it with pop dots to give it some dimension, wrapped tulle around the bottom of the dowel before inserting it and finished it off with two flowers on the clothespin. The clothespin holds your favorite photo! You could even make one to hold recipes or greeting cards. The possibilities really are endless and it cost next to nothing to make.


Don't forget to head to My Cricut Craft Room to see all the projects by Design Team Sisters!


Thanks for stopping by, I hope I've inspired you today!


Saturday, May 5, 2012

May 100 Cricut Cartridge Blog Hop Day 2


Welcome to Erica's Craft Room
100 Cricut Cartridge Blog Hop!

You should have come from  Christina.   
If not please start at the beginning at  My Cricut Craft Room so you don't miss any of todays wonderful creations.


This is my first blog hop and I am SO excited about it!  For the hop I chose Sweet Tooth Boxes, Everyday Paper Dolls & Hoot 'n Holler Cricut cartridges to work with. 

~

My first project is using Hoot 'n Holler. I like doing all kinds of different scrappy, crafty things so I decided this owl would make a cute pendant & earring set.

How I did it:
 I wanted it to be nice and durable so I cut  4 of the bottom layer, 1 middle layer, 1 top layer and 1 set of eyes for each piece of 'owl3' on Hoot 'n Holler (my pendant was cut at 2" & the earrings at 3/4"). Using Hard Coat Mod Podge I began stacking the layers with a coat of Mod Podge in between each one. After I had it all put together I put 3 coats on both sides and the edges of the owls. Once dry, I used my Crop-A-Dile to punch a hole thru the large owl. I attached an O-ring to it and hung it on an organza necklace. 
For the earrings I used my EuroPunch to make the holes because I needed something that punches a tiny hole but could go through the thickness of the diecut. I attached hypo-allergenic French earring hooks to the smaller owls and my project was completed. All 3 pieces only took about 30 minutes to make. SO quick and easy, not to mention adorable!


Saving the best for last, is my Sweet Shoppe.
 This little cutie would make a sweet gift for the baker in your life.

This is the store box on Sweet Tooth Boxes and it's cut at 10". The baker girl from Everyday Paper Dolls and all her clothes are cut at 3". I used Peachy Keen stamps on her face and cut the planter boxes by hand and added them to the windows.


 The front of the shoppe, where I turned the door upside down and made a step because I didn't care for how the door looked originally.


The other side of the shoppe, where you see the bakers bowl, measuring cup and spoon just waiting for her to come and bake up something tasty!


The backside of the shoppe.


A peek at the goodies inside.


What a yummy looking  pie that just came out of the oven! Now I'm hungry for some sweet treats! lol 


Thanks for stopping by, I hope I inspired you today!

~


Now you'll hop on over to Heather.

Remember to comment on all of the blogs to be entered in Ericas Cricut cartridge give away! Winners will be announced on her blog Tuesday.

Also make sure to follow Ericas blog so you will know when she has contests, prizes, challenges, swaps & special online coupons.


Here's the complete line up in case you get lost:
Raquel - http://kraftykaboose.blogspot.com/<--YOU ARE HERE